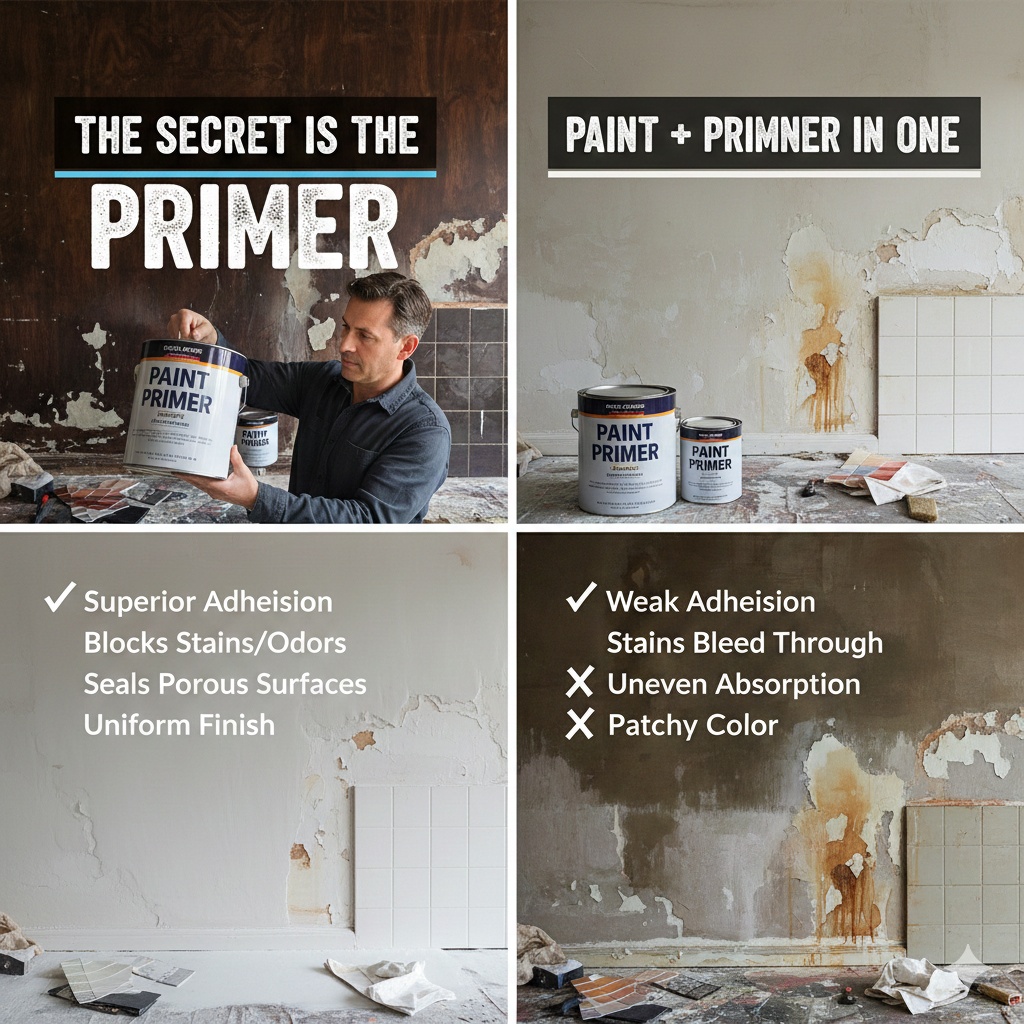
When it comes to painting, the allure of a “paint + primer in one” product is strong. It promises to save time, money, and effort, seemingly simplifying a sometimes arduous task. However, for certain challenging surfaces, this all-in-one solution can fall short, leading to disappointing results and ultimately more work. The secret to a long-lasting, professional finish often lies in the dedicated primer.

What Does Primer Actually Do?
Before we dive into why separate primers are crucial, let’s understand the fundamental roles of a good primer:
- Adhesion Promotion: Primer acts as a bonding agent, helping the topcoat adhere better to the surface. This is especially vital on glossy, slick, or chalky surfaces where paint struggles to grip.
- Stain Blocking: Primers are formulated to seal in stains (water damage, smoke, crayon, pet odors) preventing them from bleeding through the final paint coats.
- Sealing Porous Surfaces: Materials like bare wood, drywall, or masonry are highly porous. Primer seals these surfaces, creating a uniform base that prevents the topcoat from being absorbed unevenly, which can lead to a splotchy finish.
- Odor Sealing: Certain primers are specifically designed to seal in persistent odors, making them invaluable in renovations.
- Creating a Uniform Finish: By providing a consistent base, primer ensures that the topcoat dries evenly, resulting in a smoother, more professional-looking finish with true color.
Where “Paint + Primer in One” Falls Short
While convenient for previously painted, well-conditioned walls, “paint + primer in one” products are essentially thicker paints with some adhesive properties. They lack the specialized formulations needed for truly challenging surfaces.
Here’s why they might not be the best choice:
- Heavily Stained Surfaces:
- Issue: Water stains, smoke damage, grease, or marker can easily bleed through a combined product.
- Result: unsightly marks reappearing, requiring multiple extra coats of the expensive topcoat.
- Glossy or Non-Porous Surfaces:
- Issue: Surfaces like laminate, tile, slick trim, or previously oil-painted surfaces don’t provide a good anchor for paint.
- Result: Poor adhesion, leading to peeling, chipping, and easy scratching of the paint.
- Bare Wood or Heavily Patched Drywall:
- Issue: These highly porous materials will drink up the combined product unevenly.
- Result: Flashing, where some areas appear dull and others shiny, or an inconsistent color. You’ll likely need more paint to achieve coverage.
- Odor-Ridden Areas:
- Issue: Combined products typically don’t have the strong sealing capabilities required for strong odors from smoke, pets, or mildew.
- Result: Lingering smells that permeate the freshly painted room.
- Color Changes from Dark to Light:
- Issue: While not a “difficult surface” per se, a dedicated tintable primer is far more effective at blocking out a dark color and providing a neutral base for a new light color, saving you numerous topcoats.
When to Choose a Dedicated Primer
Opt for a separate, specialized primer in these scenarios:
- Kitchens and Bathrooms: High moisture and potential for grease or mildew.
- Renovation Projects: Dealing with unknown surfaces, stains, or odors.
- Bare Wood or New Drywall: Essential for proper sealing and adhesion.
- Glossy Trim or Cabinets: To ensure paint grips and lasts.
- Transitioning from Oil-Based to Latex Paint: A bonding primer is crucial for adhesion.
- Covering Dark Colors with Light Colors: A tinted primer will save you paint and time.
- Any Surface with Visible Stains: A stain-blocking primer is non-negotiable.
The Bottom Line
While “paint + primer in one” products offer convenience for simple projects, they are a compromise. For challenging surfaces or when you want a truly durable, professional, and long-lasting finish, investing in the right dedicated primer is not just a recommendation—it’s a necessity. It’s the secret weapon that ensures your paint job stands the test of time, saving you headaches and money in the long run.
Leave a Reply